Showing posts with label Helpful Hints and How-To's. Show all posts

Monday, June 17, 2013

A how-to: 100% make-ahead brunch menu

We entertained some friends this past Saturday morning at 11:30 in the morning.  Would you believe that I hardly lifted a finger that morning, instead enjoying a very calm and stress-free morning before they arrived?

I used to not like putting on brunches because it meant a frenetic weekend morning – and who wants that?!  But no more!  I found three recipes that can all be made ahead of time, making for a lovely, stress-free entertaining day.

Here’s the menu:

Fruit parfaits (assembled the evening before and refrigerated until ready to serve):

DSC_0541

Veggie and with-meat stradas (also assembled the day before and refrigerated overnight until ready to bake):

DSC_0535

Break-apart cinnamon yeast rolls (easily assembled the evening before and left to rise overnight, then baked in the morning):

DSC_0539

Unfortunately, I haven’t been back in the blogging mindset long enough to have taken photos as I put everything together. A year or two ago I would have taken photos of the entire process and blogged it immediately.  Be patient with me; I’m hobbling back slowly!

I’ll cheat and use a few links – just this once.  Here you go, the “recipe” for each item – and I use the term “recipe” lightly here!

The fruit parfaits are made with:

  • Assorted berries – fresh in the summer, frozen in the winter


  • Fit and Light Yogurt (or any vanilla yogurt)image
  • Granola


As you can see, all you need to do is layer the ingredients in parfait (or any clear) glasses, beginning with the granola, then followed by the yogurt, and topped with the berries.  I had set aside a gorgeous raspberry to put on top of a “spritz of spritz” (a dollop of whipped cream) at the last minute, but I totally forgot to do that… since I was so relaxed perhaps?!

I assembled the parfaits at about 10 PM the evening before.  You don’t want them “brewing” for too long.

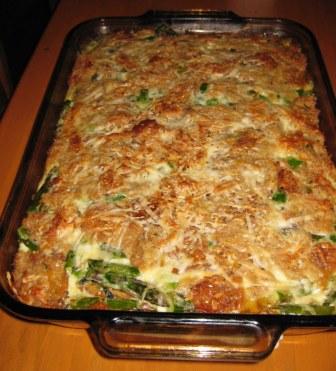
For the strada, I just followed the basics of any strada recipe (here’s one), altering the ingredients to include the veggies I wanted to use (mushrooms, spinach, onions, red peppers).  I added cooked breakfast sausage to one so I could offer both a vegetarian and a non-vegetarian version. This took me about 30 – 40 minutes to prepare the afternoon before our get-together.  In a nutshell, you layer bread in a casserole, add some sautéed veggies, pour an egg/milk mixture over everything, cover it, and set it in the fridge overnight.

After you bake it the next morning, it looks something like this:
I posted all about the pull-apart rolls here.

Ingredients:

About 1/2 cup chopped walnuts (actually, I "rollerpin" them in a sandwich bag)
About 15 frozen yeast dinner rolls
About 1/2 package (3.4 oz) butterscotch instant pudding mix
About 1/2 cup brown sugar
About 1/2 cup melted butter
About 2 t. cinnamon

For this, I have step-by-step pics!

"Chop" the nuts until they're just the right size for a coffee cake topping. As my mother would say, "Dass fuelt man." (One feels when it's right.)

Place the chopped nuts in the bottom of your greased bundt pan.

Place the frozen rolls over the nuts. I put down one row, then added a few more rolls on top of that.

Sprinkle the pudding mix evenly over the frozen rolls.

Melt the butter...

Add the brown sugar...

...and the cinnamon...

...and pour that gooey, luscious mixture over the rolls, trying to moisten the butterscotch powder.

Cover the whole thing with a towel and let sit overnight. (I put the pan in the bathroom. Why? I don't know; it's a tradition. Whenever we need yeast to rise, like on Thanksgiving, there's a towel-covered bundt pan in the bathroom. It just wouldn't be Thanksgiving around here without a towel-covered bundt pan in the bathroom.)
Get up in the morning and shuffle into the bathroom. You will be greeted by this:

Before you have coffee (but after you pee), stick the pan in a pre-heated 350 degree over and set the timer to 25 minutes.
When the timer goes off, you'll be greeted by this:

Let cool slightly, then turn upside-down onto a plate and observe with all your senses!

In the morning you’ll be greeted by stradas that are ready to bake, rolls that are ready to bake (you could probably bake them together, but I baked the rolls first and then the strada; budget about 1 1/2 to 2 hours for all the baking if you do it that way), and parfaits that are sitting in the fridge, ready to go.  I set the table outside in the morning…

DSC_0543DSC_0544

…but if we had eaten inside I could have gotten that done in the morning, too.

Even the coffee can be pre-programmed to be ready in the morning! (Don’t forget to put out some Kahlua!)

The mimosas, though, will need to be made when you want them – and yes, before noon is acceptable!  Hey, a simple mixing of champagne and orange juice isn’t too much to do on the morning of your event, is it?

Have fun – and let me know how things turned out for you!

Stumble Upon Toolbar

Sunday, February 22, 2009

Beer 101: How to brew a "Lusty Leprechaun Irish Amber"

When Peter was a baby, I'd occasionally enjoy a few sips of beer while I nursed him.  It was relaxing for me and the B vitamins were good for us both.  Once Peter was a toddler, he'd find anyone sipping a beer and beg for a sip.  I figured his love of beer was directly related to my mother's Bavarian childhood when she'd accompany her father to the local biergarten in the Bavarian Alps, sit on his lap, and sip the foam off the top of his favorite bierstein. I remember being concerned enough about Peter's love of beer that I called our pediatrician, asking whether it was normal for a toddler to like beer this much.  She suggested I keep beer away from Peter for a few years yet, but that he'd probably always like beer.

She was right.  Peter has definitely become our beer connoisseur. He still likes drinking it and is well on his way of becoming a master brewer of the stuff.  He and Aleks have even discussed starting their own brewery, called Schneiderbauer Brewery.  (Schneiderbauer was Tom's great grandfather's name.  The story is that he shortened it on Ellis Island, as a way of expediting the intake process!)  

So yesterday, while I went to Kat's dance rehearsal and Aleks tried to sleep off a bad cold (poor guy!), Peter showed Elisabeth and CJ how to brew an Irish Ale -- presumably for St. Patrick's Day -- and Tom played photographer.  (You can get this recipe at Mountain Home Brew's web site.  This is where we get all our brewing supplies.)

It's important that all brewing materials be very clean.  Wash the pot -- which can be used ONLY for beer brewing and never for any other purpose.

IMG_0431

Sanitize the fermenter.

IMG_0444

Now fill the pot with  2 - 3 gallons of clean, fresh spring water.  Don't use tap water, as it usually has too many minerals in it.

IMG_0439

Bring the water temperature to 150 degrees.  While you're waiting for it to heat up, add steeping grains to a large muslin bag. 

 IMG_0448

Have agreeable and easy-going boyfriend be the steeping grains bag supervisor.

IMG_0452

Also while waiting for water to heat, listen to your little brother teach you all about beer making.  IMG_0461

He knows his stuff, so listen up, even if he is your baby brother!

IMG_0439

Once the water is 150 degrees, add the bag with steeping grains to the pot.

IMG_0470

Take a whiff. 

IMG_0471

Steep grains for 15 minutes.  IMG_0478

Tend to the beer while your brother and your boyfriend man-bond.  This is a good thing.  IMG_0480

Remove grains.  Be an adorable couple.  IMG_0483

Remove pot from heat and stir in powdered malt extract.  IMG_0498

Then add liquid malt.

IMG_0508 

All of it.

IMG_0517

Taste it -- because you just can't resist.  IMG_0523

Add pot back to stove and bring wort to a gentle boil, then add in hops and gypsum. Boil for 60 minutes, adding Irish Moss 45 minutes into the boil.  (I don't have photos of this because Tom and Peter decided to go to the motorcycle store instead of taking pictures!)

Note that your mom notes that your boyfriend cleans up.  This endears your mother to your boyfriend and elicits comments regarding permission to date him seriously. 

IMG_0527

After 60 minutes, remove wort from stove.  Remove hops and cool down quickly by surrounding pot in sink with ice cubes. 

Probably take part in some flirty ice cube games with boyfriend, since no one else was home at this point.

Get beer-serious again.  Once wort has reached 85(F)  degrees...

IMG_0533

...add to your sanitized fermenter.  Top with 5 gallons more of cold, fresh water.  Aerate well and pitch in brewing yeast --which your little brother taught you all about before he and your dad took off for the motorcycle store.  IMG_0529

Attach the airlock to your fermenter.

IMG_0550

Place the fermenter in a cool  (60 - 70 degrees) dark place.  Unless you want to hear "beer farts" for two weeks, put it in a closet and close the door.

Allow your beer to ferment until "complete," about 7 - 10 days, then bottle the beer, wait 10 - 14 more days and enjoy!

Add your home brew to this variety of beers already in the fridge -- from a cheap can of Bud Light to the $11 bottle of Dogfish Head IPA, which was shared by 6 of us last night:

IMG_0548

Stumble Upon Toolbar

Sunday, November 16, 2008

How to Decorate Your Bedroom With a New Color Scheme Each Week

As I've mentioned quite a few times, Tom and I sleep under fabulously cozy and fluffy individual down-filled European duvets that Laura's family gave us when we visited her in Germany last year.

I bought three sets of duvet covers while still in Germany, but have been unable to find them in America since returning. Not even Ikea will ship their German bedding to Ikea stores in America! How ridiculous is that?

After looking high and low for German-sized duvet covers in America (and online anywhere, with an option to ship to the States), I came up empty-handed. I finally turned to my dear friend Thomas, to whom I have shipped quite a few pairs of Levis over the years, asking him to send me some German bedding from Ikea near Nurnberg. He was kind enough to do that, so now we have five different looks for our bedroom:

White-on-white-on-white (with a touch of fluffy gray):

IMG_3803

A yummy, soft blue and white dotted flannel. This is no ordinary flannel -- it's thinner and softer than American flannel, and has almost a slight "furry" quality to it. Delish in the winter!

IMG_7502

This is my favorite when I'm feeling bold and colorful:

IMG_9712

And when I'm feeling staid, proper, and mature, I put these on the bed:

IMG_9715

And these are Tom's favorites because he likes the stark and simple look of black & white:

IMG_9719

And added in February, 2009, after a trip to Costco, these beautiful paisley sheets, used with the stark white duvets covers mentioned above. Can you believe that the entire queen size set was $19.99?! (I gave Elisabeth, who also bought this set, the flat sheet, so she can make extra pillowcases.)

IMG_0992

Which set is your favorite?

How often do you change the entire look of your bed -- and thereby the whole mood of your bedroom? I have a feeling this whole German bedding thing is about to catch on, not only because they're so versatile and easy (no more blanket-hogging!), but because they're an inexpensive and attractive way to give your bedroom a whole new look every time you change your sheets!

Stumble Upon Toolbar
Related Posts with Thumbnails